Showing posts with label how to. Show all posts
February 20, 2013

Are you surprised that I'm doing a post about rice? I'm surprised that I'm doing a post about rice. But wait a sec, because this is not a throw-away post. Rice can be so awesome when it's done right! I've learned a lot about it in the past year. Real rice, that is, not Minute Rice. Mostly how to soak it, cook it, and make good things out of the leftovers. But the other day I learned something new! Something I will pass down to my daughter. Something that changes everything.

I cooked my rice in chicken broth.
It was the best rice of my life.
Lesson learned.
Stop cooking rice in water.


Now that we've established the importance of trying rice cooked in broth at some point in your life- hopefully sooner rather than later- I wanted to share some other ricey things. I've been asked what kind of rice I buy and whether or not I soak it, so let's start there.

1. I usually keep a bag of both white rice and brown rice in my cupboard. I like to have white rice (Jasmine or Basmati) on hand for a quick throw-together meal, because it takes less than 20 minutes to make. It's also easily digestible. And I like brown rice because it has such a nice nutty flavor and as it's a whole grain, it has more nutrients! I do buy organic rice when I can. (because it is one of the most highly pesticide-sprayed crops)
2. Unless brown rice is sprouted or soaked, it is harder to digest (the bran in brown rice contains phytic acid, an anti-nutrient that prevents your body from being able to get the vitamins/minerals in the grain) so I do soak it every time before I cook it. I soak brown rice in my special rice soaking water. Oooh! Fancy, right? It's super easy. I'll explain how I soak and cook it in just a minute!
3. Rice is great hot and fresh out of the pot, of course, but I also keep a bowl of leftover in my fridge all the time to whip up fast meals. Here are my favorite ways to use leftover rice... in a stir fry, with this sausage & kale soup poured all over it, cilantro rice salad, sweet cinnamon vanilla rice, or even as a base for a gluten-free quiche!
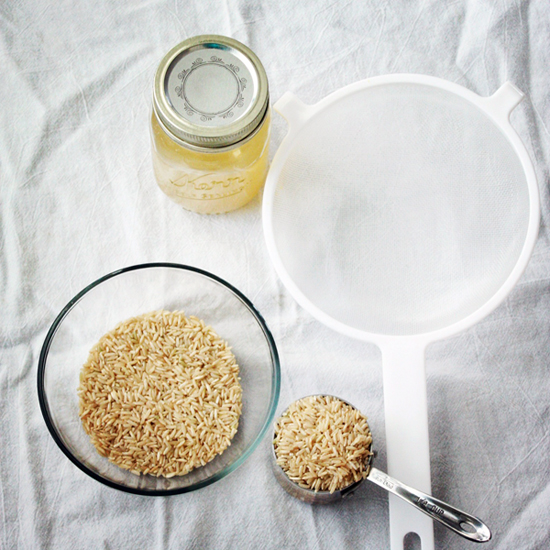

How to Soak Brown Rice 

1 cup brown rice
filtered water

Add 1 cup of brown rice to a glass bowl. Warm some filtered water to body temp. Cover brown rice with the warm water. Cover bowl with plastic wrap or a kitchen towel and soak for 24 hours. Strain the rice and save the soaking water in a mason jar in the fridge. The next time you are ready to have some rice, just warm your soaking water to body temp again and combine it with rice, and soak for 24 hours. Repeat as often as you like! Each time you use your soaking water, the brew will become stronger and more effective for reducing phytic acid and increasing enzymes. *Never heat the soaking water above body temp (burning to the touch) because you'll kill the live enzymes.

How I Cook Rice

White Rice: Combine 1 cup of rice with 1 3/4 cup of broth or water in a small pot. Bring to a boil, then reduce heat to low and cover the pot. Set timer for 17 minutes. When timer goes off, remove rice from heat and fluff with a fork.

Brown Rice: Soak 1 1/2 cups of rice overnight. (see above) Put the soaked rice and 2 cups of broth or water in a small pot. Bring to a boil, then reduce to low heat and cover the pot. Cook rice for 45 minutes (or as long as 60 minutes), until all the broth/water has been absorbed and the rice is tender. remove from heat and fluff with a fork. Serve hot with sea salt and some healthy fat!

What's your favorite way to enjoy rice?


November 9, 2010
at deer hunting, the girls usually do something girly. one year we made mini scrapbooks. last year grandma marian gave us all a class on her blue ribbon apple pie. this year, we got to make sweet cake stands! you know i was super excited about this. they're so simple-quick and practical. all of us girls were saying how much we love a 5-minute craft, especially one that you can actually use. i'm so hooked on the ease of it that i might just be making hundreds in the next few weeks. seriously, they would make such fabulous christmas gifts.


stackedstands

what you need: 
1. one pretty plate, as fancy or plain as you please. 
2. one small vase, candlestick holder, or goblet. 
3. a strong glue that says it works on glass or metal.

fyi: our plates and bases came from thrift stores. (where else?!)

what you do:
1. turn your plate upside down.
2. squeeze a ring of glue onto the rim of your base, and place in the center of your plate.
3. let dry. don't move your stand until the base is completely secured to the plate.  

madecakestands


make a few and stack them on top of each other for a tiered look. use them to serve your holiday goodies. or as a stand for candles and garland. or create an elegant centerpiece. or even better.. wrap them up and put them under the tree for all your favorite girlies!


ps. have you started your christmas shopping yet? 

October 12, 2010
some of you have been asking, and waiting really patiently, for a little word from me on photography. i'm honored about this. really, thank you! i am still very much a learner in this department, but i do love it. over the past couple years my camera handling has changed dramatically. here's how i've grown/my advice if you want to have more fun with your camera.
mewithcamera

1. read your camera manual. i know everybody says this, but really, read it! until you actually get it. it can help you know your way around your camera and empower you to try new things.. like making the switch to manual. this is how it all began for me. it's what made me pick up my camera, realize its potential, and motivated me to learn how to do (hopefully) pretty things with it.
2. read other photography literature. if you love something, you'll find you're willing to spend time on it. do some research, even! i read photography 101 by nicole hill gerulat and would happily recommend it to anyone and everyone. such a clearly-written, handy little book. i loved it.
3. switch to manual. yes, it takes guts to give up the auto setting, but it's sooooo worth it. once you do it, a whole new world opens up. start playing around with the aperture and shutter speed. if you've done any reading on these subjects, and please do look them up at least a little bit, that will help you feel more comfortable and in the know. focus on familiarizing yourself with how your photo changes as you spin dials on your camera.
4. look at other photography. keep your eyes open for inspiration on how to compose and style a photo. for example, you don't have to center the subject of your photo! try something new. always look from a couple different angles. find a background or table that you love to photograph on. find some new find a few photography blogs that you love and make sure you pay attention while you flip through magazines. eye-catching photos are everywhere! try to figure out what makes them that way and what types of photos you love most. (happily for me, i love food photography.. and i love to make food! it works out pretty nice.)
5. natural light!! from my experience, this is probably the biggest and best thing you can do for your photos. i strongly recommend not using your flash. as much as possible! i would also recommend not depending on photoshop to make your photos presentable. try very hard to make them as lovely as possible straight through your lens, with the best light you can find. i love using window light for my food photos. in fact, it is pretty much all i use. if you can find a good window or two in your house (mine are south-facing), that is a perfect place to set up shop for a good photo shoot.


i don't have a super professional camera (i use a canon rebel xsi), but i've learned how to make it work for me by doing a little reading and fieldwork, using the manual setting, learning good times of day to shoot, and playing around with different angles and props. over time, you'll find your comfort zone and find yourself coming back to the same photo characteristics.. and then, hooray! you've found your own style.


now for a little shop talk. i've also been asked about giving a little photoshop lesson, to show how my photos go from upload to finished. so here it is.. my super simple photoshop tutorial. let's take my photo from yesterday as our model. 


imagesize
1. open up photo in photoshop and size accordingly. 


sharpen
2. sharpen it up a tad. (under the filter tab, find "sharpen")
3. then, because i don't want anything to look too made up, i always fade my sharpening. (under the edit tab, go to "fade sharpen" and adjust to your liking.
4. next, if your photo has any spots that you don't like... like stray crumbs or a distracting chip in the paint.. use the spot healing brush tool (on the far left tool bar) to fix tiny imperfections. i try to avoid these things before i even take the picture, but sometimes they can add to the character of the photo, so don't feel pressured to erase them. we don't want an air-brushed look! 


adjustments
5. next, we go to the image tab and find "adjustments." this is where i mess around with a curves layer, or the saturation, or whatever the photo might need just a little touch of. occasionally i will play with the contrast or gradient map, or even a photo filter once in awhile, but i mostly keep it very very simple. curves is my favorite tool, and i usually stick to that. 


curves
6. for this photo, all i'm going to do is a bit of curves. i shot this one in the morning, so it looked a bit dark. the curves layer will help brighten it, and the white background will look closer to white than gray. then you're ready to upload to flickr!
7. basically, i just keep it basic! size + a bit of sharpening + a bit of brightness. i like things very light, crisp, and natural. keep your adjusting minimal and you'll avoid anything fakey. the best thing you can do is start with a good photo, so focus on getting everything right (as much as you can) while you're looking through the lens. 


hmmm... anything else? i hope this has helped in some small way. please leave me questions in the comment section! i'm sure i missed things and could be more clear on others. i'd be so happy to help! 


ps. i can't believe it.. last year on this very day i was revealing my big secret. a whole year! how?!

hello

hello

about this blog

Hello, I'm Summer. A people-loving introvert whose hope and life is in Jesus. His promises are my passion and my ministry is homelife. This blog is a place for me to write about everyday things. Especially food. My favorite thing to do is sit around a table, lingering over a long meal with good conversation. I live with my husband and our 2 littles. We like blizzards, thrifting, grammar, guacamole, cheerful hearts, nice manners, good movies, and making simple, real, nutrient-dense food.

"If Christ be anything, He must be everything."
-C.H. Spurgeon

 photo ai-4.png  photo af-6.png  photo at-4.png  photo ap-6.png  photo ama.png

old posts